Being free to move over hills on foot or in the air is a privilege only achieved with a paraglider. There is no other sport that allows such diverse adventure from such a small and lightweight piece of equipment. Hike and fly draws on many disciplines, learned over years of flying and experience in the hills. This experience allows you to use your paraglider as a tool to move efficiently over complex terrain.
In Europe the popularity of hike and fly is booming, encouraged by the advent of light weight equipment and the dramatic reduction in pack sizes. It is seen as an active sport, and many use it as a form of exercise. In the UK we have been slower to accept the concept, generally preferring to drive to a take-off than walk. Certainly, our hills and weather are different, but once you start looking you will begin to see new opportunities for flying and adventure.
In the Black Mountains and Brecon Beacons we have a huge playground designed for hike and fly. The hills are smooth and clear and there is an extensive network of footpaths. This guide aims to explain the concept and the tools to use to be successful and enjoy it.
The following routes are great starting points for anyone interested in a bit of hike and fly in our local hills. Use these routes to practise all the aspects listed in the concept section. Plot the routes in advance, compare the weather to the forecast and actual from the Blorenge wind station, perfect your management of equipment and learn your vital statistics regarding speed/time. If the forecast doesn’t favour any of these routes, look for your own.
Pen Cerrig Calch (Magic Mountain) and Blorenge
SEWHGPGC is blessed with two fantastic club sites that are perfect for hike and fly, and cover every wind direction. If the forecast wind is light, one of these two hills is flyable, and offer a 500m hike to take off to start.
Use these two hills to practise using the equipment, learn the apps and learn about yourself. Two hiking routes are shown below, practise using your mapping app to plot your own route.
SEWHGPGC have produced three hike and fly challenges for club members to participate in. They vary in complexity to encourage development in the discipline. Completion of each task will be rewarded with a patch for your rucksack.
⦁ Fan Dance?
⦁ Welsh Three Peaks Challenge
⦁ Vol Biv
We also encourage anyone who enjoys hike and fly to participate in the annual Dragon Hike and Fly competition held in the Brecon Beacons and Black Mountains.
The expression Vol Biv has been adopted from the French, meaning fly and bivouac, or fly and camp. It introduces a new element to the idea of hike and fly and means we can extend our adventures to multiple days.
The concepts discussed for hike and fly remain, but now we must think about a bit more equipment, provisions and route planning.
Hike and fly races take the sport and make it competitive. Generally, a route is set from a start to a finish through a series of turn points. Travel is only permitted by foot carrying your equipment or by flying. The pilot is responsible for everything we have discussed in the concept section, from weather assessment, route planning, site assessment etc. We have our own race in the Black Mountains every year called the Dragon Hike and Fly, a superb entry for anyone interested in racing.
The main hurdle that prevents people from racing is the confidence to sign up. Doubt about equipment, experience, fitness etc all make us hold off from entering which is a great shame. None of these reasons should stop you from entering, you just need to get to the start line.
This guide is aimed to explain how to approach a race and what to think about during it. It is also focused more on races of a maximum of three days, longer races such as the X-Alps and X-Pyr are a different kind of endurance.
Below is a link to a video produced by club member Alistair Andrews of a beautiful November Hike and Fly in the Black Mountains.
Sleeping equipment is now required, and how you approach this is up to you. Roll matts, sleeping bags and tents will all make your night more comfortable. They do add weight and require space though. If you are out for one night and you know it will be dry, you could decide to leave the tent behind and sleep under the stars. You might also decide to leave the sleeping bag behind and sleep in the wing which does work well, but might not be how you want to treat it. A roll mat is generally always advised for comfort and heat loss.
Some single skin tents are very lightweight and use walking poles instead of dedicated tent poles. Ask around and see what other people use.
Unless you are going to incorporate a pub into your Vol Biv, which is a great idea, you will need to carry more food for dinners and breakfasts, and will probably need a method of heating them. Again this can be bulky and heavy, so think carefully about what you are taking. Dehydrated ready meals are a good option, combined with a camping burner such as a Jet Boil.
For water plan to collect and treat your water with purification tablets or by boiling it.
Now we are beginning to think about where we want to camp, and where we want to be to give ourselves a good starting position for the next day.
You might be hoping to camp in a town for the reason of a meal or to restock your provisions. Alternatively you plan to stay out in the hills but should think about where your nearest source of water is or where you will be most protected from the elements. The plan for the next day might mean that you choose to land early and high so that you are in a good position.
There are so many variables regarding Vol Biv that I won’t begin to try and cover them all, just ensure you think through the trip, about your provisions and about all the eventualities to mitigate surprise and risk to yourself.
The Black Mountains offer a great playground to give Vol Biv a go. A couple of route options are described in the classic routes.
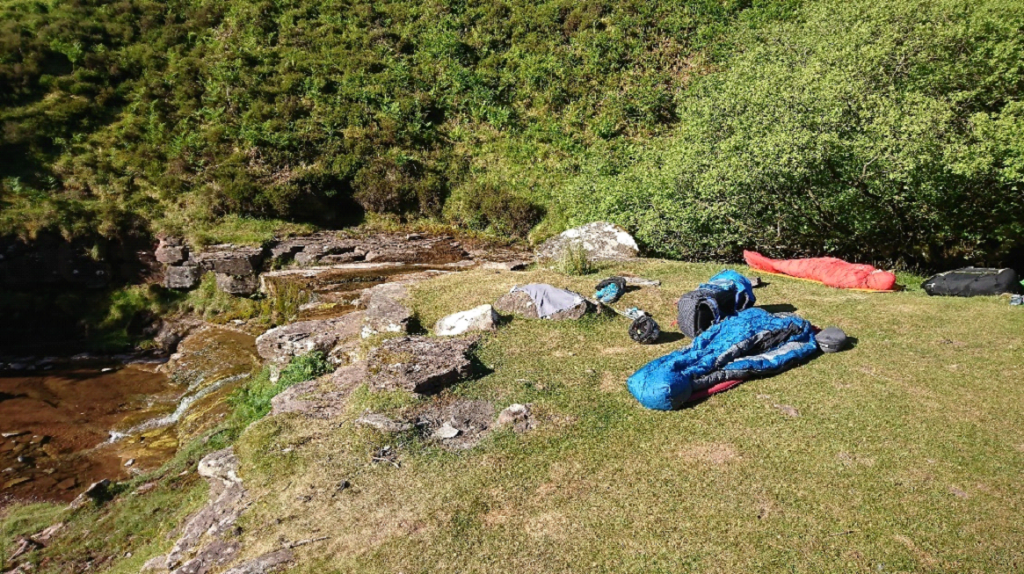
A perfect camping spot for the night, no tents required, on a Vol Biv from Pandy to Hay Bluff.
Below are links to videos produced by two of our own club members on their individual and monumental Vol Biv expeditions. They are captivating to watch and will teach you an awful lot about hike and fly and Vol Biv.
Steven Mackintosh – Nepal – https://youtu.be/mLX0XSvv-PE
Tim Pentreath – The Alps – https://youtu.be/jDad3NYJXbg
Weather Assessment
There are two parts to this, forecasting and actual.
We are all used to looking at forecasts and planning a day’s flying. When looking at the forecast consider where you plan to be at what time during your hike and fly, and if there are any key times to note. Can you pick a route that favours the forecasted changing wind? This will be looked at further under Time Awareness.
Actual weather assessment is very important. Remain vigilant as you walk and watch for clues to the current weather, this might mean you change your plan earlier rather than later and save an unnecessary walk to the wrong hill. Also learn to use current weather data on your phone. We are very lucky to have the Blorenge Weather Station. Begin to build a mental (or paper) record of how a wind speed and direction on the Blorenge manifests itself on the hill you are on. You might find that 20kph on the Blorenge is a gale on a higher hill deeper in the Black Mountains, and this information will be of value to you on another day.
Site Assessment
As paraglider pilots we all naturally look at terrain through different eyes, instinctively looking for everything we need to know about a site and its flying potential. Hike and fly takes you away from club sites and their site guides, and forces you to use your own judgement.
You can prepare yourself by studying local maps, build up a good mental image of the topography. Consider how the air might flow around the hills, and which wind directions would favour them. Is there a wind direction that might make this location unsafe due to valley winds or being in the lee of other features? Identify other risks such as power lines, limited landing options etc. If you have a route in mind, try and identify where you would plan to launch from so that when you arrive there part of your site assessment is already complete.
While walking look for signs of the conditions. Wind in the tops of the trees, birds soaring or thermalling and throwing a few blades of grass in the air are all methods that will tell you a lot and might mean you identify a more appropriate launch site en route.
Once you are on the hill and you are looking for a suitable take off take your time. If you need to walk higher to make a better assessment of the wind and its direction, then do. Look for somewhere free of obstruction or anything that might damage your equipment. We are very fortunate in our hills that we generally don’t have to look very hard to find a nice grassy take off.
What you are planning on doing with your flight will also affect your site choice. If you are looking to fly a top to bottom and then go to the pub, you might be happy to run the glider off a shallow hill with a cross wind. If however you are looking to go cross country, you will be looking for something that provides more opportunities.
If you are in any doubt, then wait for better conditions or move on by foot until a better option presents itself. We are out having an adventure, but physics and our own skills remain the same so don’t try anything you wouldn’t try on a recognised site.
Time Awareness
This is important and has several implications.
The first thing to know is how fast or slow you move. There is no correct speed, but it’s important that you know what you are capable of. After a few outings you will begin to learn what you can do, and with experience you will become quite good at judging how long a hike will take you just from looking at a map (Mapping Topic). The Blorenge and Magic are both fantastic hills to hike and figure out your stats. Both are described in the Classic Hike and Fly Routes section and are a good place to start.
Once you know this information, it means you can incorporate it in your planning. You will be able to plan ahead and anticipate what time you will be arriving at a potential take off. This will then have implications regarding weather, light left in the day etc.
Time awareness of the weather and where you are is important. How much longer will the flying window be open for, or when will it improve? This is information you gathered from the forecast in advance, and you will now use it in conjunction with your present position. You do not want to hike to a hill, find it takes you longer than expected and when you get there the wind has changed and it’s not long before sunset.
When we discuss racing, time awareness plays another role. Where do you want to be at the end of the day? Probably not an hour from the nearest road where your supporter is waiting.
Mapping
This is a great topic! What do you use in the air and on the ground? I will talk specifically about two apps and use screenshots from them because they are what I know. Other apps are available.
ViewRanger
Knowing How to use this app is power. The free mapping option is more than enough to get you started; OS overlay is available to purchase. All screenshots will be based on free mapping.
Obviously it’s a map, and shows you terrain, paths and contours. Hopefully you are familiar with reading a map, if not spend some time studying it and comparing it to the terrain around you. Ideally you will be able to look at it and instinctively know from your weather assessment which slopes offer potential flying options.
What ViewRanger does very well for us is allows us to plan and make quick route assessments. The ‘Plot a Route’ function might not be completely intuitive to start, but you will quickly learn. By dropping a few points on the map along your chosen route you will get a distance and a climb/decent. Now that you know how fast you move you can make a quick assessment of how long this will take you.
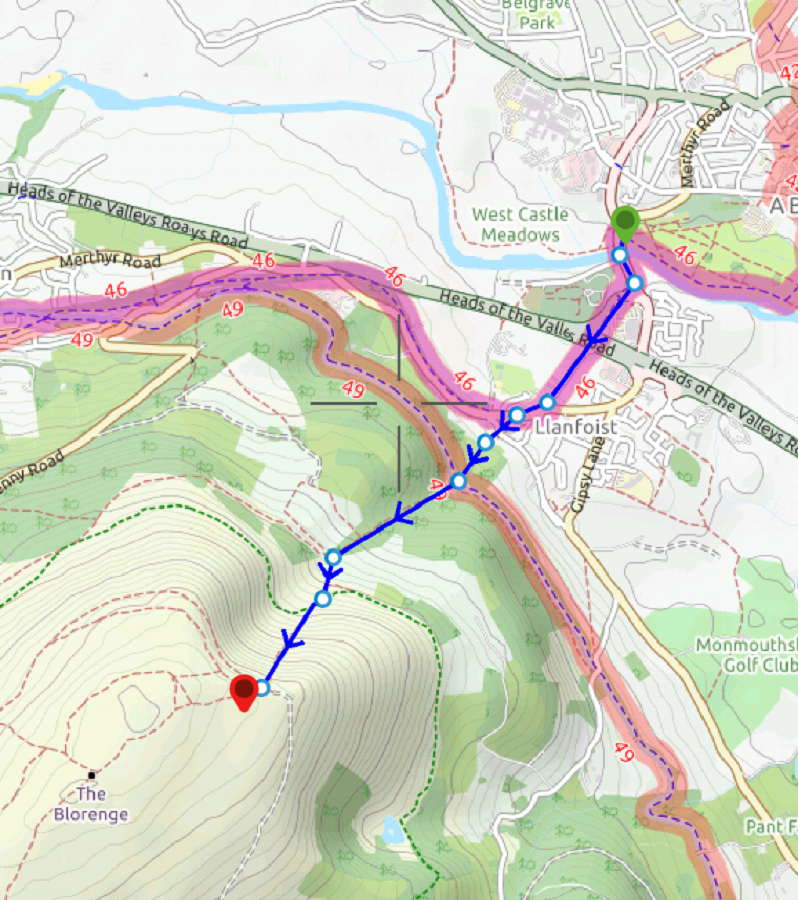
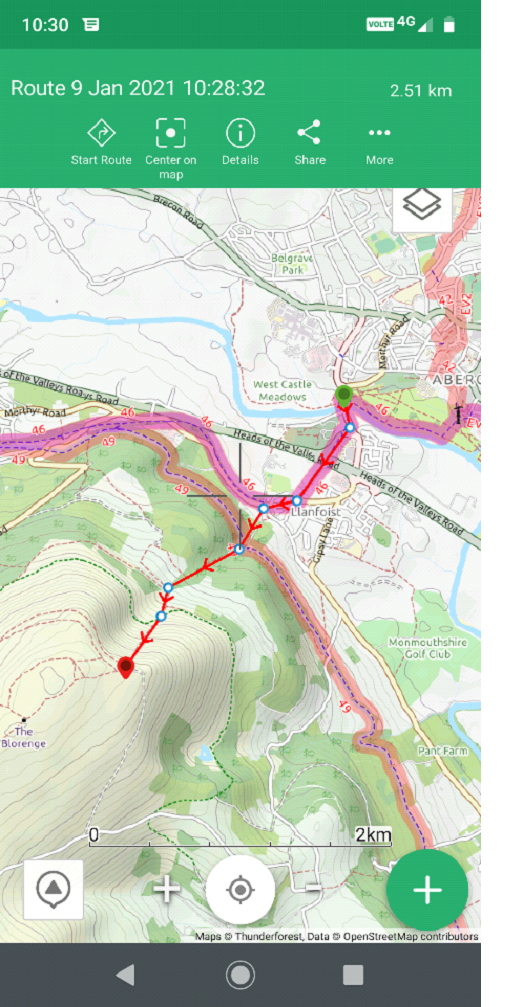
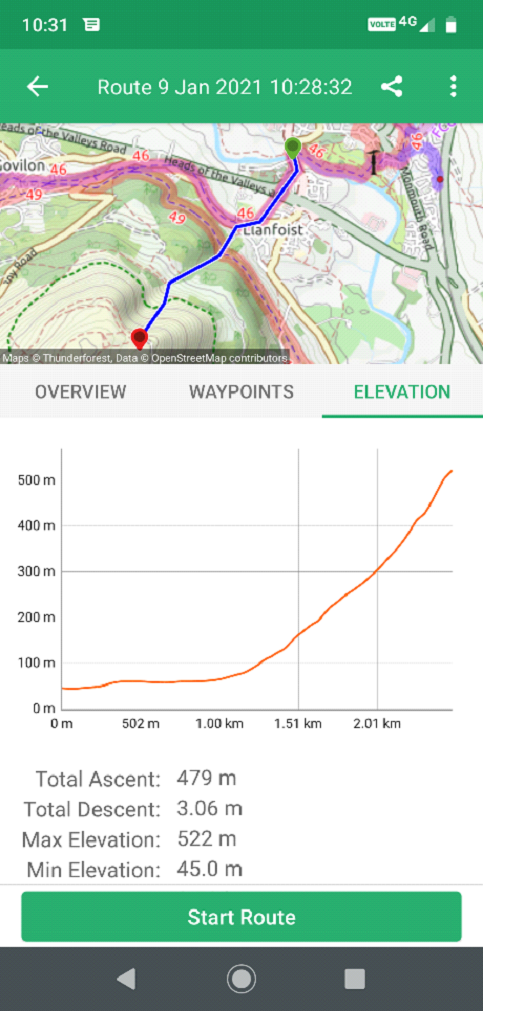
Using the Blorenge as an example, the two images below show it’s taken seven points on the map to plot a route from Castle Meadows to the Take Off. The route is 2.5km long, and looking at the elevation section the total ascent is approximately 480m. This has taken very little time to produce some very useful information, which we can now use to determine how long it will take to get to take off.
Another method to generate a rough estimate of distance and height is to use the cursor function. The crosshairs button centres the map on your location. Your altitude is displayed in the top left. If you now pan around the map with the cursor and put it on a point of interest, the distance to that point is displayed and that points elevation. A useful feature for a quick estimate.
By recording your track from the start your phone will always know where you are, and won’t take several minutes trying to locate you when you start the app. It will also give you distance, elevation and speed data at the end of the day, if that interests you.
All of the maps are downloadable for offline use too, so, if you land somewhere you weren’t expecting, you will know exactly where you are, with all of the footpaths around you and the ability to scope out take off options. People love to compare this to a paper map that doesn’t run out of batteries, but we would have to carry a lot of paper maps and in hike and fly weight is important.
XCTrack or Other
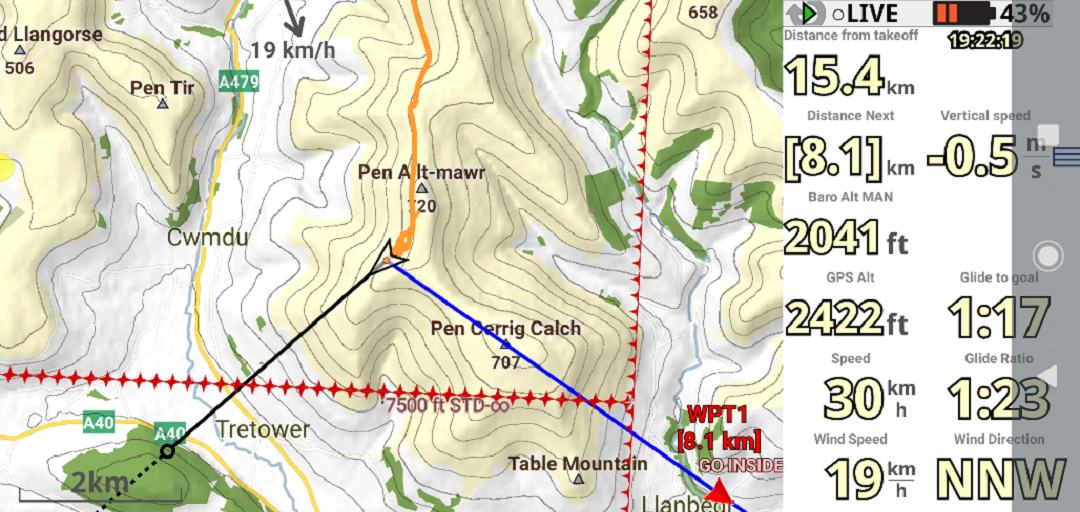
It is very useful to have a good terrain file on your flying app to allow you to assess your route while in the air. The screenshot below is from XCTrack, taken from a flight from Hay Bluff to Crickhowell (Classic Hike and Fly Routes).
Points to note:
⦁ The quality of the terrain file.
⦁ The calculated wind arrow, and how this can be used to identify into wind slopes in conjunction with the terrain file.
⦁ The black glide line, and the black circle which indicates your point of impact if your glide ratio remains the same. This is really useful for hike and fly and can be used to judge crossing obstacles such as rivers and roads. It should be used careful in case the conditions change, but a useful tool.
I am text block. Click edit button to change this text. Lorem ipsum dolor sit amet, consectetur adipiscing elit. Ut elit tellus, luctus nec ullamcorper mattis, pulvinar dapibus leo.
Whether you use a personal tracker or another method, let someone know where you are and when to expect to hear from you. This might aid your rescue or prevent an unnecessary and embarrassing unwanted rescue. Send a text before you descend into a valley!
Everyone has their own requirements, from gel to sausage rolls. Ensure that you take enough to keep you going all day. If it turns in to a big day on foot you will need a lot of food to keep you moving. Eat regularly and if you are slowing down or finding it hard, it’s probably because you haven’t eaten enough. The same goes for water, it might be heavy to start but keep drinking and your bag will get lighter. Carry some form of purification tablets too in case you run out, or maybe that is your plan.
Only fly if you feel its within your capabilities, just like you would anywhere else. Hike and fly shouldn’t demand any more advanced piloting skills than flying a recognised site, its more about sensible decision making and site/condition assessment.
Practice launching in different conditions and directions, the wind might not always be bang on the hill. You might just need to run the wing off the hill sideways to cross a valley or fly down. Forward launching, reverse launching, side launching, and kiting are all skills used when moving through the hills. Practise these whenever you can so that you know what you and your wing are capable of.
Use whatever equipment you currently own to get started. Light weight equipment is nice, but plenty of people use standard gear for hike and fly. You are probably already comfortable with your current wing and harness which makes your decision making on the hill easier.
With time you might consider a lightweight glider or harness. The gear is less durable, but you should be proficient enough not to be dragging it over the ground. Light weight wings are easier to launch in lighter conditions. When packed into the rucksack, having a compact and lightweight bag is a different experience and very enjoyable.
Consider using walking poles, they are a big aid when hiking up hills with weight on your back. If you haven’t tried them before, borrow some. You will be more stable going uphill and downhill, you will have better traction when the ground is slippery or loose, your posture will improve with a bag on your back, and you will likely move faster. They don’t need to be expensive, just make sure they can pack down small enough to fit in your harness when you fly.
Avoid carrying excessive numbers of flight instruments. The use of the mobile phone for mapping and tracking when on the ground and in the air really means no other flight instruments are required other than a small Bluetooth vario. The phone also gives us our communication, weather etc and so you should carry a battery pack to allow it to run for a day or longer. 10000mah is a good starting point, they aren’t big, heavy or expensive. Don’t forget the cable.
A small first aid kit with a torch and matches/lighter is a sensible item to carry.
Go through everything else you have in your rucksack and consider if it’s really necessary, the weight all adds up
You don’t need to go and buy anything special, but if you are interested or getting more serious about hike and fly here are some considerations.
Lightweight trail shoes are very popular in the sport. They offer good grip and don’t weigh you down on a long hike. They are generally best worn off-road and might wear out quite quickly if used on pavements/roads. Trail running socks are also very good at controlling moisture. With time you will find a combination that works for you to prevent sore feet and blisters. Ask around to find out what other people use.
Wicking materials for base layers are generally better than cottons because they won’t hold the moisture as badly. This helps when you cool down and get ready to fly, and means you won’t be wet with sweat in your harness.
If you are using a pod harness, shorts are generally warm enough when flying and obviously more comfortable for hiking. If you aren’t in a pod harness, zip off trousers might be the answer. Elastic waistbands are beneficial because they negate the use of a belt which might interfere with the rucksack and become uncomfortable.
Plan to be warm in the air like you normally would. It might be hot hiking, but at 5000’ you need to be warm. You might get caught in adverse weather on the ground too.
Maps courtesy of OpenStreetMap Contributors.
Paragliding generally is not a particularly physically demanding sport. Introduce a hike up a hill and suddenly it’s a fantastic activity to improve your fitness. If you hike up the Blorenge, Magic or any other hill once a week you will quickly begin to feel stronger and fitter. Maybe start to walk to every take-off when you fly and leave the car at the bottom. This makes the retrieve at the end of the day easier too, Pandy is a perfect example.
This said, your fitness is what it is, and just like your equipment don’t think you have to change it before starting to hike and fly. Set yourself realistic targets with regards to your routes, starting with an evening walk up a hill and a top to bottom will teach you a lot about what you are physically capable of.
Others might use hike and fly as a reason to remain fit. Personally, the thought of feeling strong and enjoying being out in the hills with my paraglider on my back is what motivates me to get out and run for training.
If you require further advice about a particular SEWHGPGC site please contact a Club Coach. Please report all accidents to The Club Safety & Training Officer Steve Millson and the BHPA. Please visit the BHPA for the most current Incident Report Form.
This document is a guide only.
We advise that anyone Hang Gliding and Paragliding conduct a dynamic risk assessment prior to flying any site. This should be continuously re-assessed due to the changeable conditions of the outdoor environment.
All individuals are advised to take the following into account when making their dynamic risk assessment:
Paragliding and Hang Gliding are dangerous sports that can cause serious injury including bodily harm, paralysis and death. Flying SEW sites is undertaken with the full knowledge that Paragliding and Hang Gliding involves such risks. As the pilot you take exclusive responsibility for all risks associated with your part taking in the sport.
Any liability claims towards the club are excluded.
If you are not sure. DO NOT FLY.
Please use common sense, hike and fly doesn’t mean a free-for-all. Abide by site guides and seasonal restrictions. If you come in to contact with landowners you must remain courteous, you are representing the club and sport.
